[Answer ID: 14463]
How to: Connect USB hard drive to wireless router to share the files on network (User-Friendly Firmware).
Simply by attaching a USB hard disk device (HDD ) to USB port , Buffalo User Friendly firmware auto detects and configures the HDD device as a network attached storage to access and share files on local network .
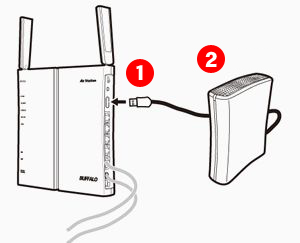
- Connect USB HDD to the USB port on the wireless LAN router.
Turn on the Power of the USB HD
By default no limit access to HDD is enabled on LAN. you should be able to access the device from your windows file explorer by entering router IP (\\IP . For example \\192.168.11.1 )
- Connect Client PC to Router. To set up NAS details.
- Launch browser to administrator WEB management UI. To access to the Wireless LAN router, Enter router URL i.e. IP address [\\ 192.168.11.1].
- Log-in, refer to documentations for default user name and password.
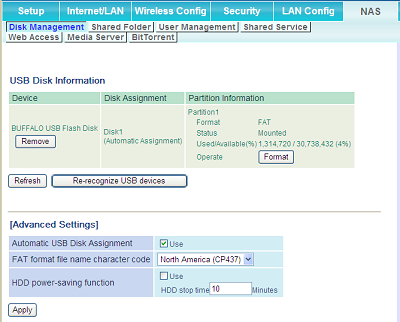
- Click NAS | Disk Management to see if the device was detected . If the HDD is already formatted you do not have to re-format device.
Look at the side help on WEB UI for the list of supported formats. As of this writing, User Friendly supports FAT 12/16/32 and XFS.
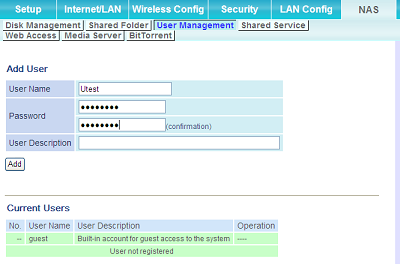
6. Click NAS | "User Management" tab to create a NAS user accounts. Entering a name and password and click "Add" button to create the user account.
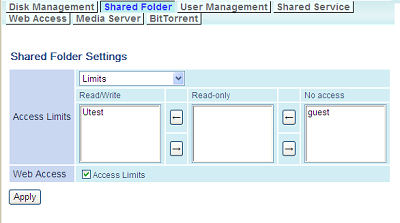
7. To limit access to HDD to selected users with valid accounts. Go to NAS | "Shared Folder" . From drop down menu select "Limits". Next, select user name and click arrow button to move
access level to "Read-only" or "ReadWrite".
Details